MultiTech Niagara Driver
About the MultiTech Niagara Driver
The MultiTech Niagara Driver brings LoRaWAN® sensor data directly into the Niagara Framework, enabling building teams to manage both IoT and traditional BMS devices within a single, unified environment. By eliminating the need for middleware, custom APIs, or complex integration steps, it simplifies deployment and accelerates time to value.
Sensor data is automatically normalized and ready for use in control logic, alarming, scheduling, and analytics, which unlocks insights that were previously difficult or costly to access. The result is a more scalable, efficient, and intelligent approach to building management.
Prerequisites and Tips
Review the following prerequisites and tips before implementing the MultiTech Niagara Driver:
- The MultiTech Niagara Driver is compatible with Niagara 4.15 only.
- You must have read-write access to the directories where Niagara is installed. This is typically the C:\Niagara\Niagara-{installed version}\modules folder, but the location may vary on your system.
- After you discover and add a MultiTech gateway to the Niagara database, you must ensure the gateway’s HTTPS certificate is accepted as an Allowed Host. These instructions are in step 3 of MultiTech gateway Property Sheet view.
- If you receive errors when adding or viewing sensors or other items, this
usually why:
After you make changes to sensors, templates or definitions through the mPower interface of the gateway, make sure to click Sync on the module Sensor, Template or Definitions view to apply these changes to the module.
Upload MultiTech gateway modules to Niagara
MultiTech developed two modules for MultiTech gateways on Niagara, which are available as jar files:
- multiTechGateway-rt.jar
- multiTechGateway-ux.jar
Download the files from the Niagara Driver page on the MultiTech website. You can then load the jar files to Niagara on a Windows/Linux server or a JACE.
Load the modules on a Windows/Linux server
To load the gateway modules on a Windows/Linux server:
- Go to the Application Director on the server’s Platform in Niagara Workbench.
- Stop the station if you are installing the modules on a server where the station is already running.
- Exit the Niagara Workbench.
- Copy the two jar files to the C:\Niagara\Niagara-{installed version}\modules folder.
- Start the Niagara application.
- Restart the station to load the modules onto the station.
Load the modules on a JACE
To load the gateway modules on a JACE:
- Go to the Application Director on the JACE Platform in Niagara Workbench.
- Stop the station if you are installing the modules on a JACE where the station is already running.
- Exit the Niagara Workbench.
- Copy the two jar files to the C:\Niagara\Niagara-{Installed Version}\modules folder where you have the Niagara Workbench installed.
- Start the Niagara Workbench, then open the JACE connection.
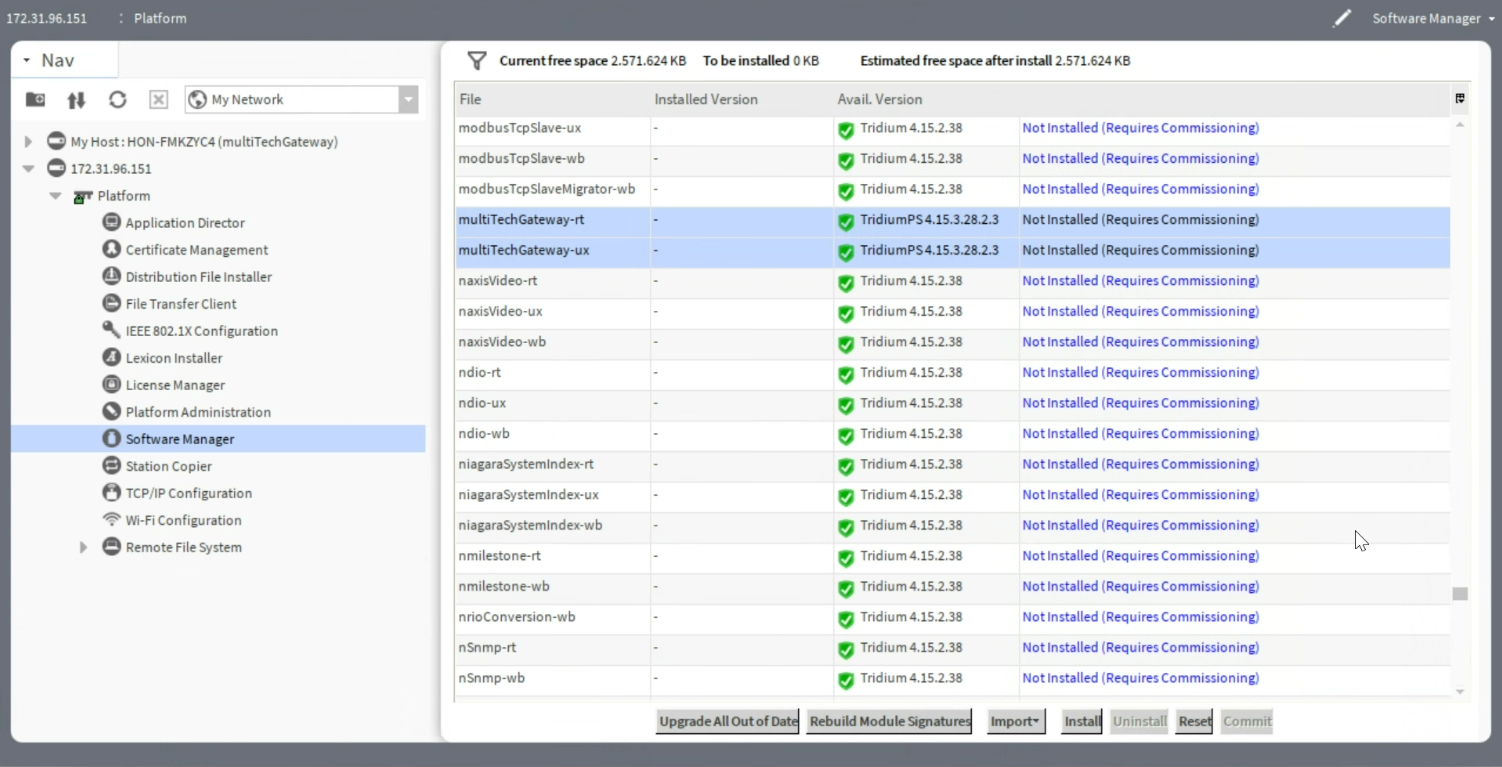
- Go to the platform and double-click Software Manager to load the Software Manager view and identify the jar files in the view pane.
- Select the jar files and click Install.
- Click Commit to add the modules to JACE.
- Restart the station to load the modules onto the station.

Set up a MultiTech gateway in Niagara
To set up a MultiTech gateway in Niagara:
- Create and start a new station or start the existing station.
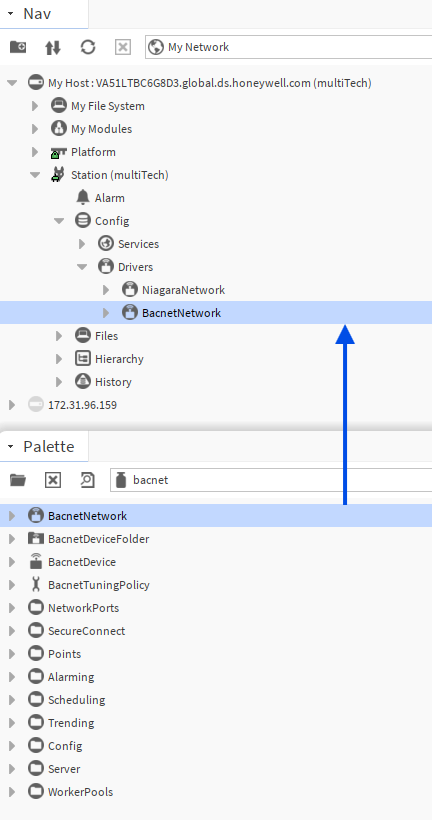
- Open the BACnet module from the Palette and drag and drop
BacnetNetwork into Drivers, if you do not already have a BACnet
network in place.
- Select one of two ways to add the MultiTech gateway module onto the station:
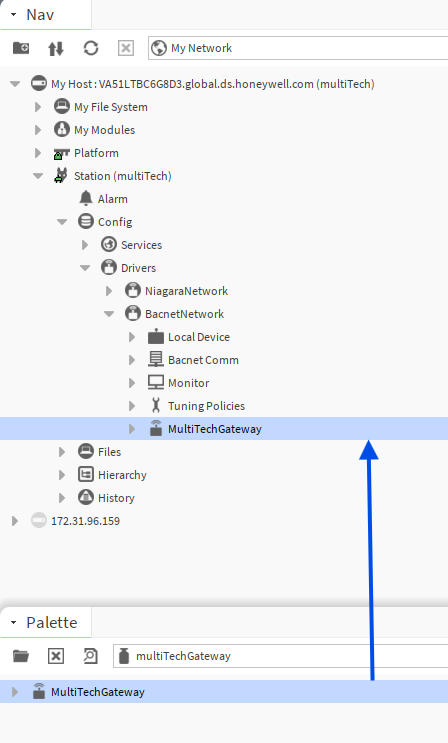
- Option 1: Select the MultiTech gateway from the Palette and drag and
drop MultiTechGateway into BacnetNetwork.
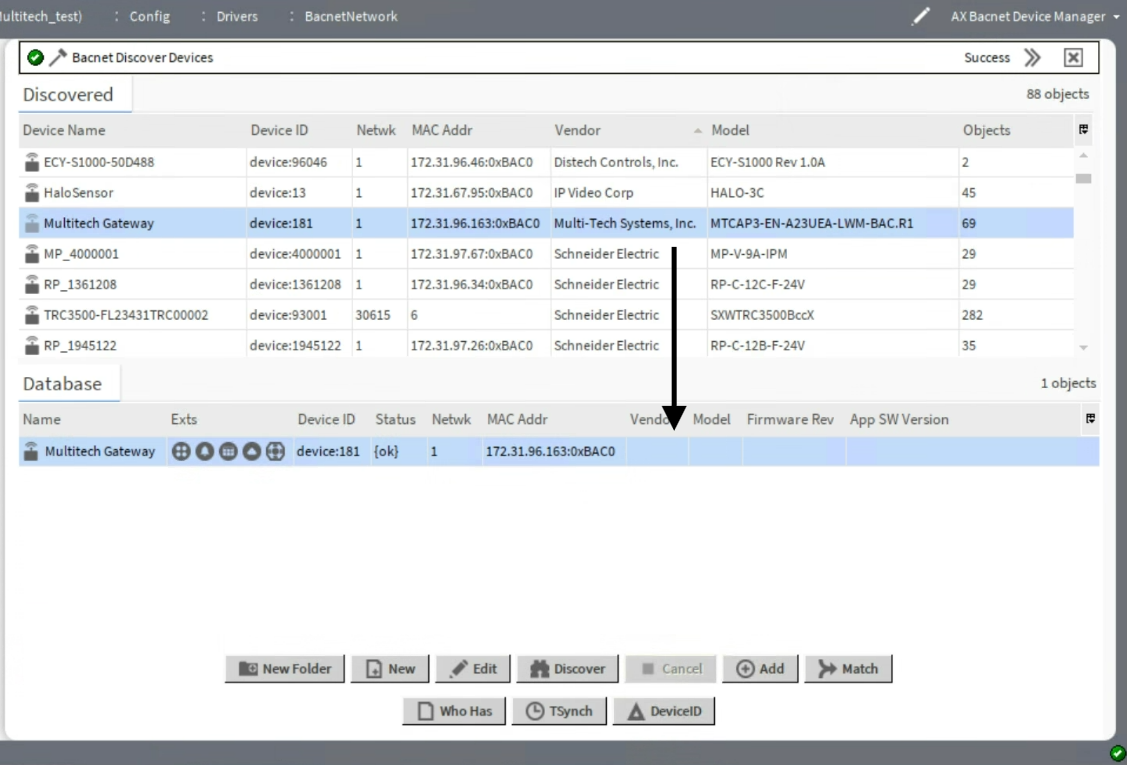
- Option 2: Open the Discovery Manager view on the BACnet
network and click Discover. If the gateway is available on the
network, it appears in the Discovered pane.
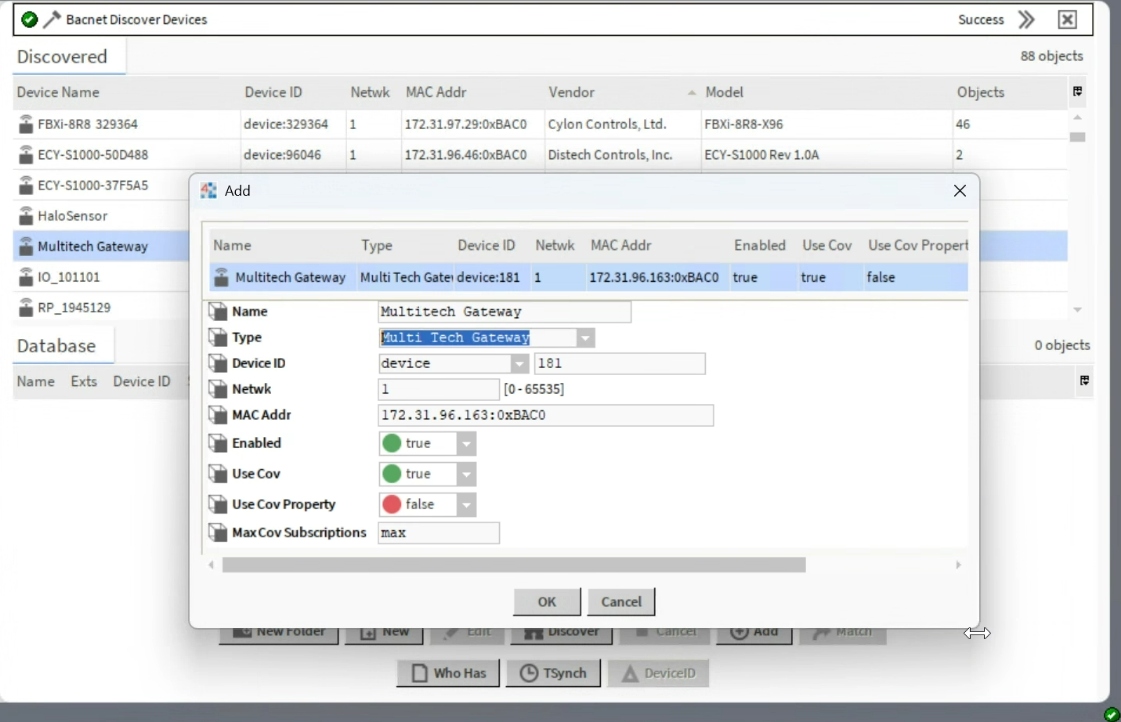
- Drag and drop the MultiTech gateway into the Database pane.
- Change the device type to MultiTech Gateway.
- Drag and drop the MultiTech gateway into the Database pane.
- Option 1: Select the MultiTech gateway from the Palette and drag and
drop MultiTechGateway into BacnetNetwork.
MultiTech gateway Property Sheet view
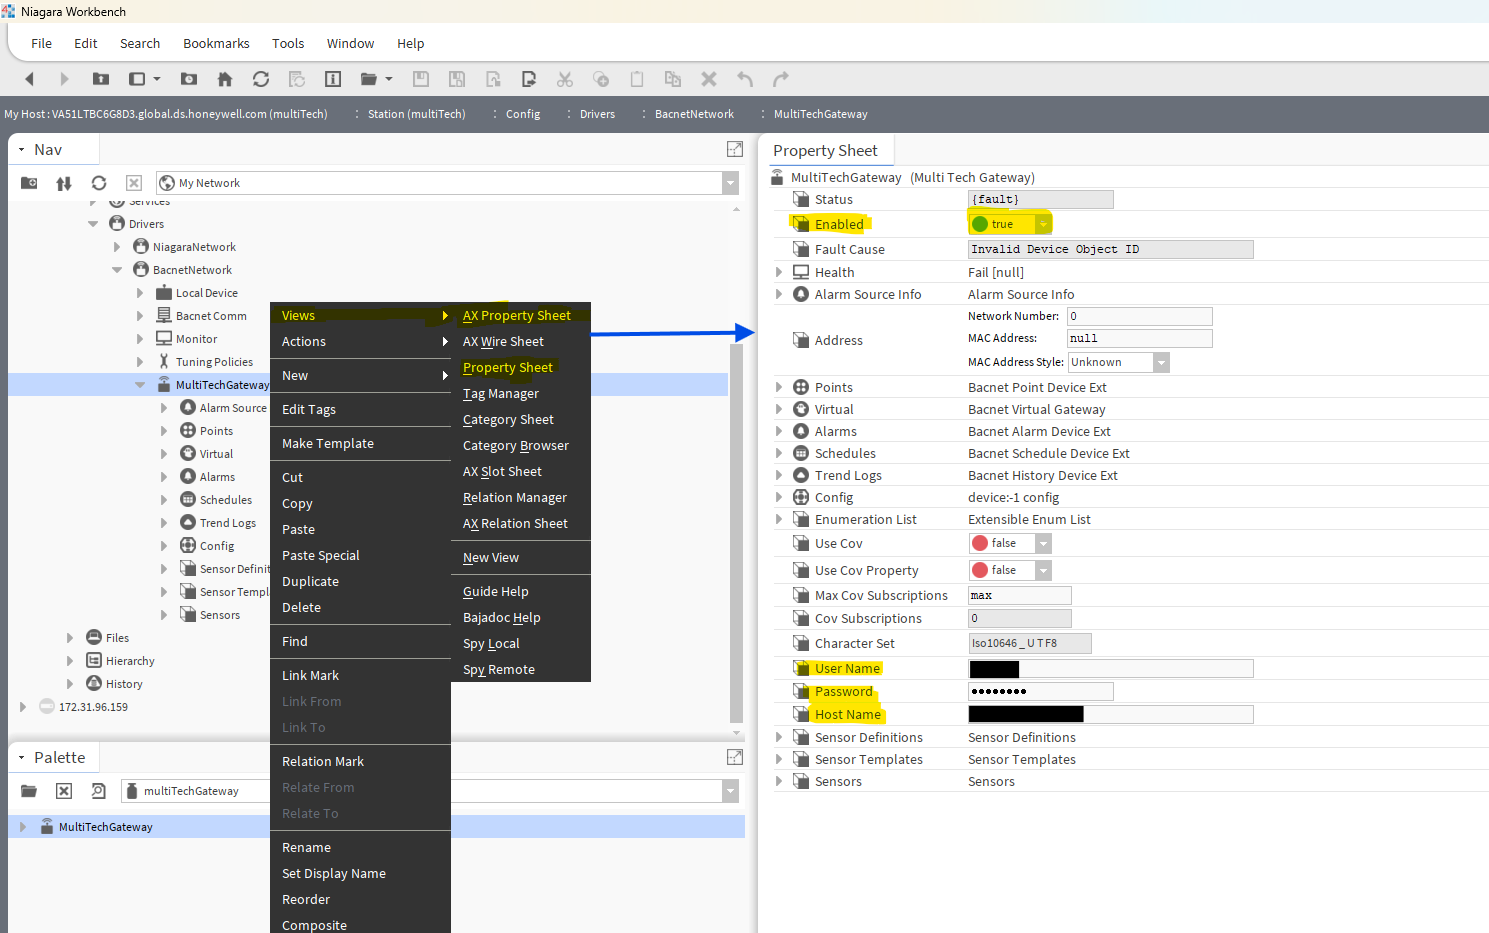
- Double-click the MultiTechGateway component under the BACnet network to
load the AX Property Sheet view. You can also:
- Right-click the MultiTechGateway component.
- Select Views > AX Property Sheet view or Views > Property Sheet from the menu.
- Verify Enabled is true for the gateway, which is required to make the connection. By default, the gateway is enabled when added to the BACnet network. You will lose the connection if Enabled is false.
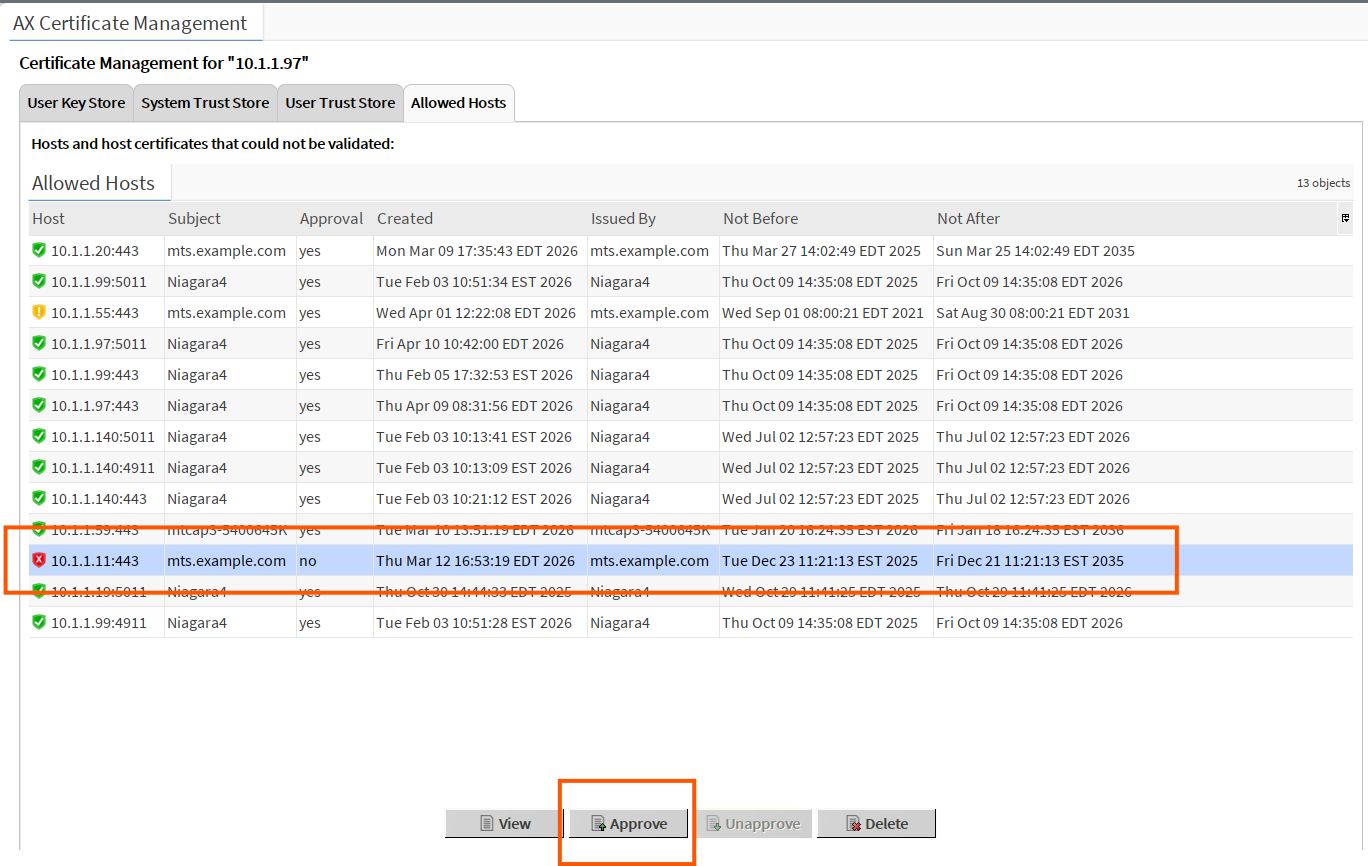
- View Platform > Certificate Management >Allowed Hosts to ensure the gateway’s
certificate is approved for use in the Niagara environment. If your gateway is new,
you will need to approve it.
- Click Approve to allow the gateway and station to communicate.
Custom Properties for the MultiTech gateway
This table provides details on the custom properties created for the MultiTech gateway.
|
Custom Property Name |
Purpose |
|---|---|
|
User Name |
Stores the user name used to make a successful connection between Niagara and gateway access. |
|
Password |
Stores the password used to make a successful connection between Niagara and gateway access. |
|
Host Name |
Stores the host name used to make a successful connection between Niagara and gateway access. For example, 192.168.1.1. |
|
Sensor Definitions |
Stores each sensor definition component, which in turn stores the information about that sensor definition. |
|
Sensor Templates |
Stores each sensor template component, which in turn stores information about that sensor template. |
|
Sensors |
Stores each sensor component, which in turn stores information regarding that sensor. |
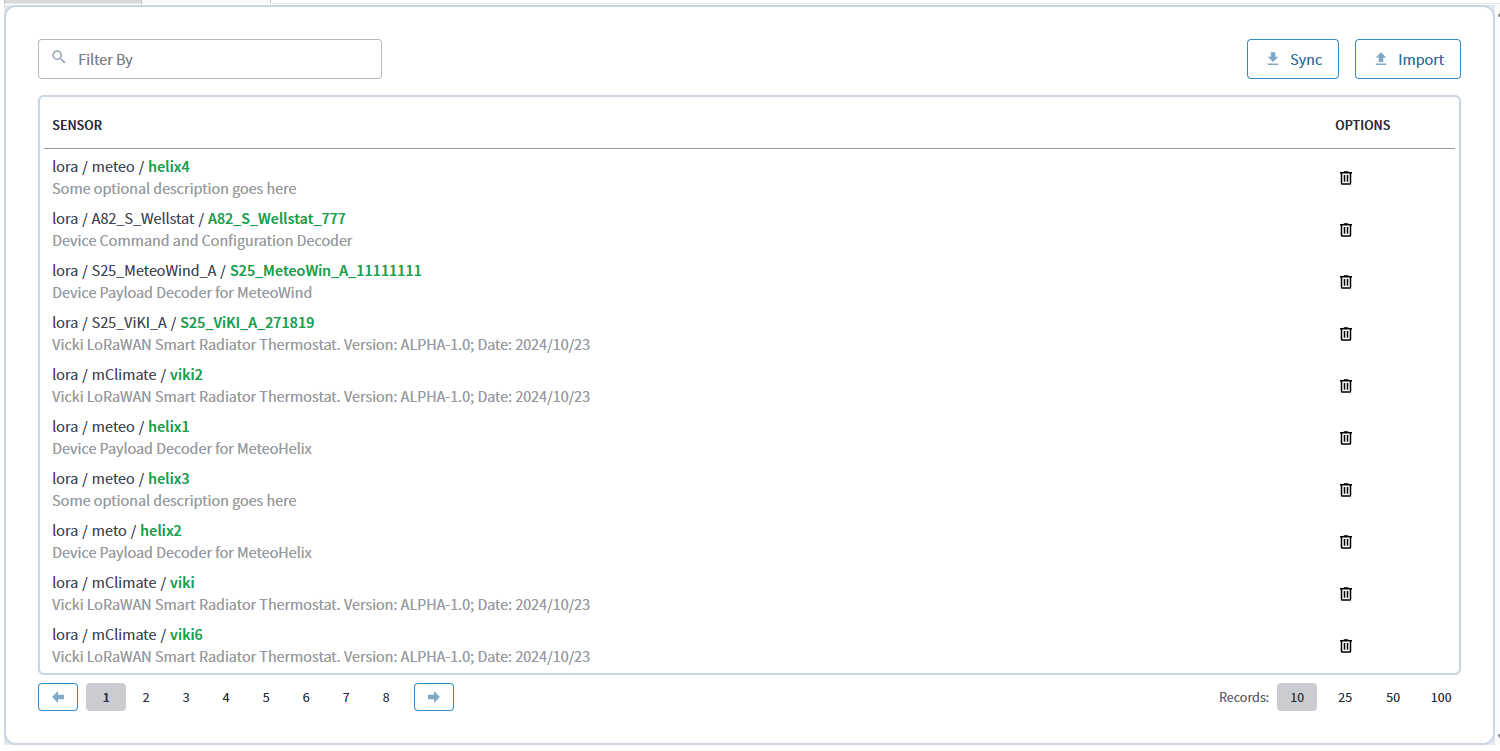
Sensor Definition Manager view
- Double-click the Sensor Definitions component under the gateway. The
Sensor Definition Manager view loads and displays all the sensor
definitions created on Niagara.
- The Sensor Definition Manager view supports the following features:
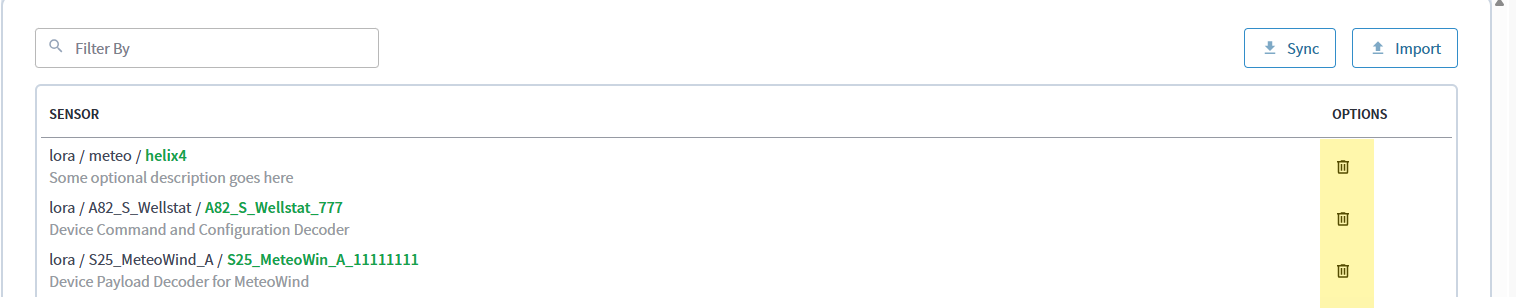
- Filter rows based on sensor name and description
- Pagination
- Select the number of records to show on each page (10, 25, 50, 100)
- Click Import to add a new sensor definition
- Click the delete icon under Options for a row to delete a sensor definition
- Click Sync to sync sensor definitions from the gateway to Niagara. For each sensor definition on the gateway, a corresponding component is created under the sensor definitions component and automatically loads in the view.
- Click Sync whenever there is a change to a sensor definition or if you create any new sensor definitions on the gateway.
Import a sensor definition
You must add definitions and decoder files to import if they do not display in the Files folder on the station. First follow the steps to add the files to either a JACE or a Windows/Linux system.
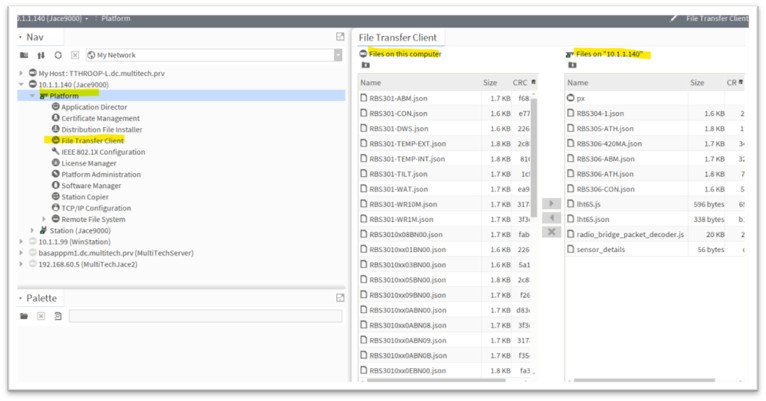
JACE installation
- Open the Platform of the JACE.
- Click File Transfer Client.
- Transfer files from your computer to the Files folder on the
JACE.
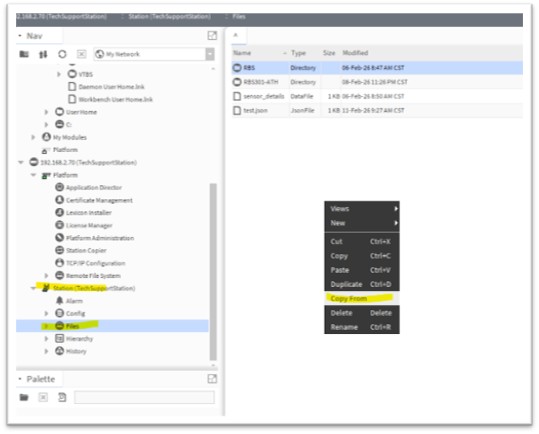
Windows/Linux installation
- Go to the Files folder on the station.
- Right-click in the blank area and choose Copy From. This opens a window for you to copy
sensor definition files from your computer to the Station > Files folder.

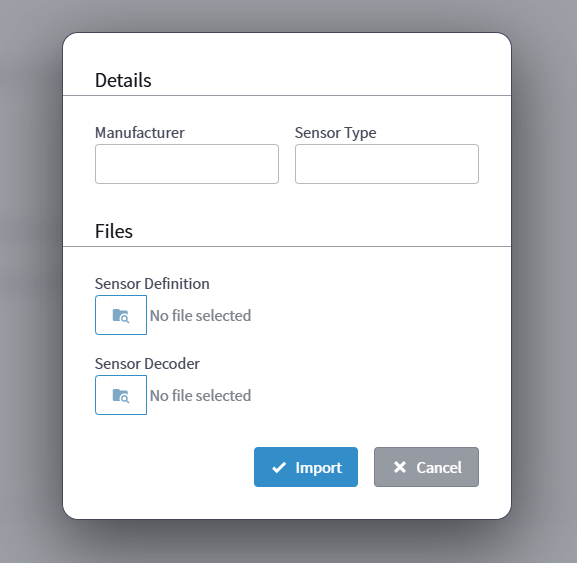
Import a sensor definition
- Click Import on the Sensor Definition Manager view to open the Import Sensor
Definition window.
- Enter the Manufacturer and Sensor Type details.
- The Manufacturer field validates the following:
- Name must start with a letter
- Name may only contain alpha-numeric, hyphen, and underscore characters
- A maximum of 15 characters is allowed
- The Sensor Type field validates the following:
- Sensor type must start with a letter
- Sensor type may only contain alpha-numeric, hyphen, and underscore characters
- A maximum of 32 characters is allowed
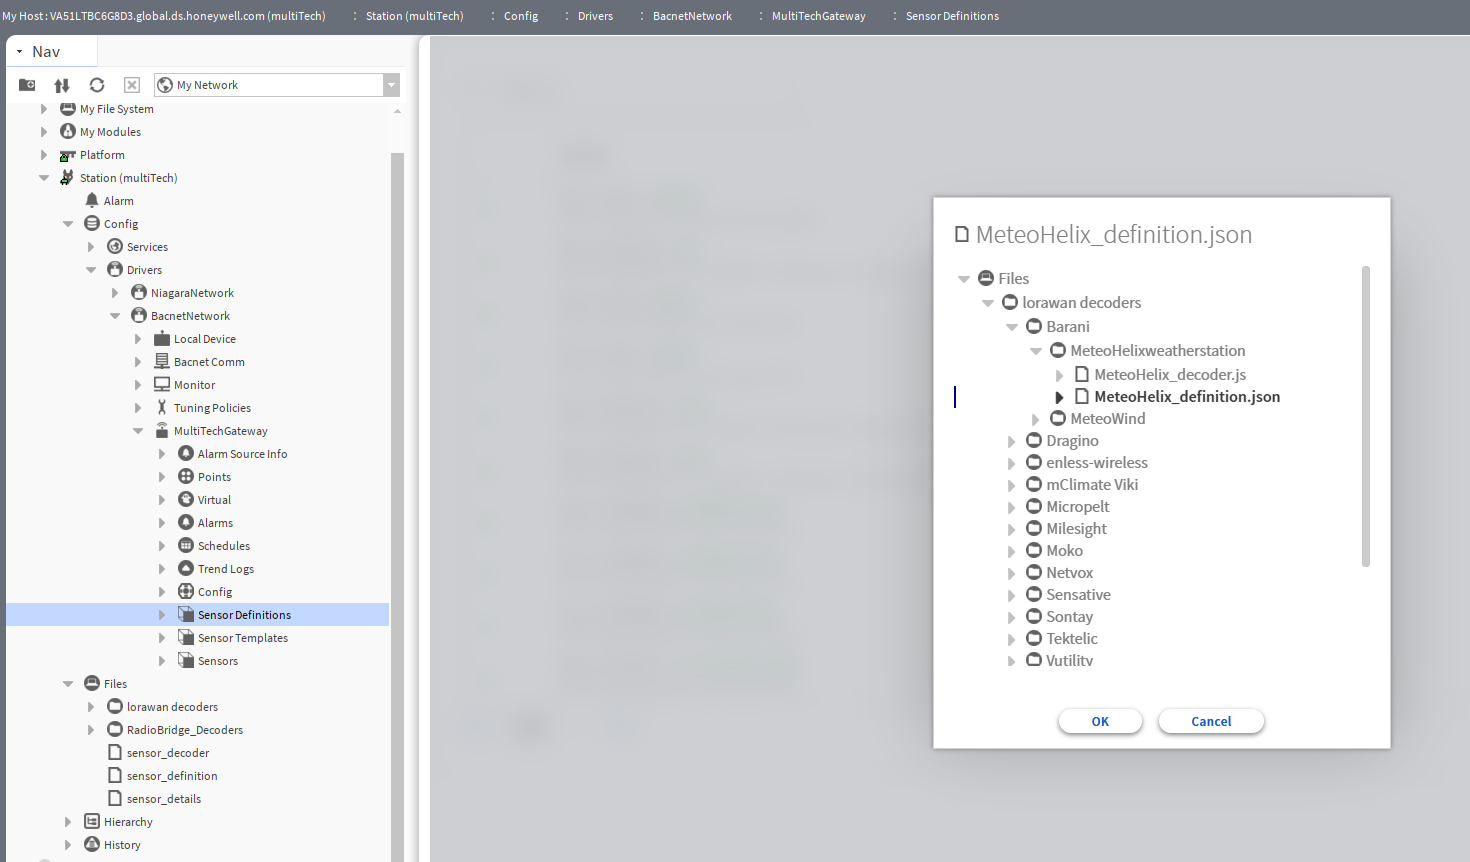
- Click the folder icon to open a browser window to select the definition and decoder
files. Add these files to the station Files folder before the import, as the
scope of the file picker is only to this folder. It is your responsibility to select
the correct files to add the sensor definition without errors.
- Verify a new sensor definition appears both in Niagara and on the gateway. The Sensor Definition Manager view loads.
- Review the import notification that appears when the sensor definition uploads. You will
either see a success or a failure message.
- Import success:
- Import failure:
- Import success:
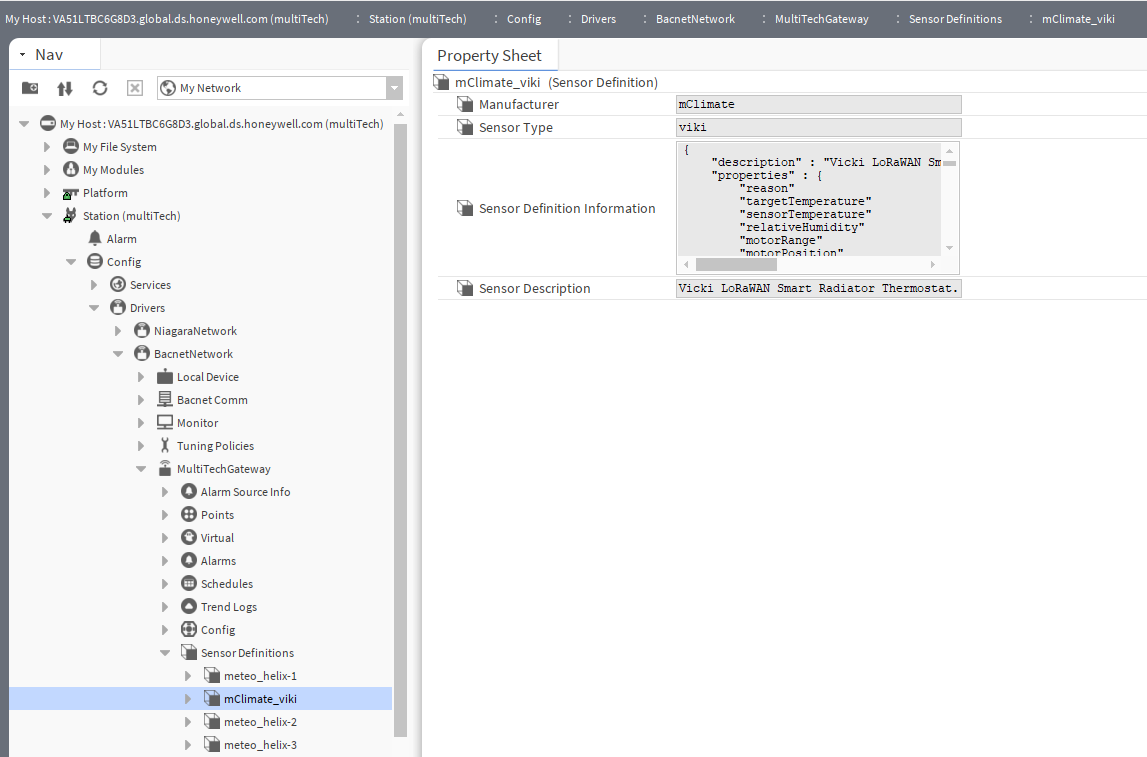
- Verify a new sensor definition component appears under Sensor Definitions after
successful import. It should contain the following properties:
Property name
Purpose
Manufacturer
Stores the manufacturer name. (Read Only)
Sensor Type
Stores the sensor type information. (Read Only)
Sensor Definition Information
Stores the sensor definition file contents. (Read Only)
Sensor Description
Stores the description from the sensor definition file. (Read Only)


Delete a sensor definition
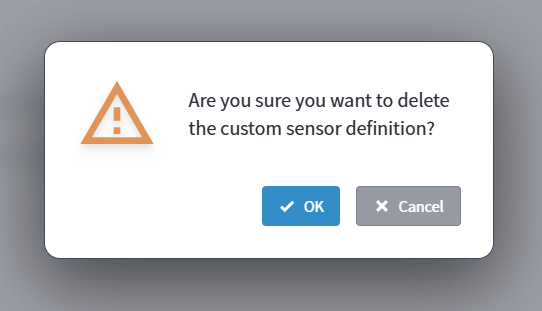
- Click the delete icon under Options for a row to delete a sensor definition.
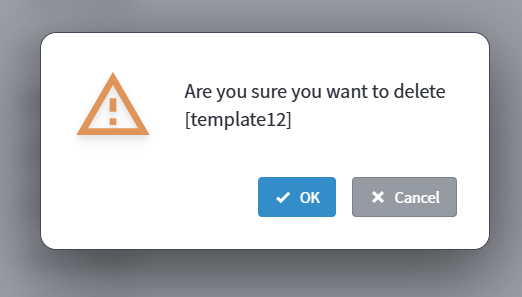
- Click OK in the verification window to remove the sensor definition from both Niagara
and the gateway. Click Cancel to return to the Sensor Definition Manager
view.
- Review the deletion notification that appears when you delete a sensor definition. You will
either see a success or a failure message.
- Delete success
- Delete failure
- Delete success
- Verify the sensor definition component no longer contains the deleted sensor definition.


Template Manager view
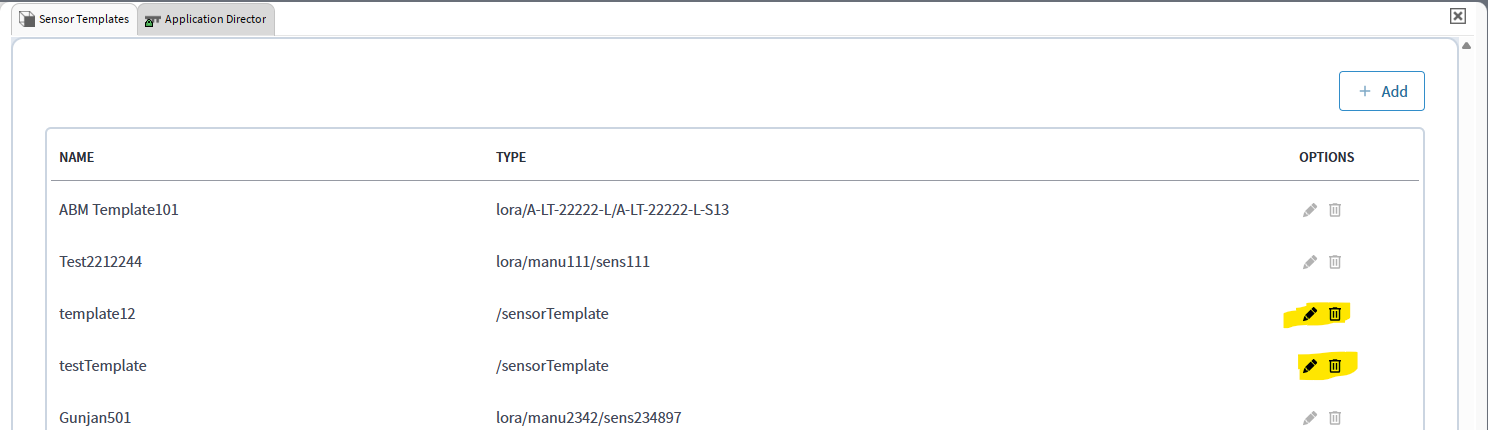
- Double-click the Sensor Templates component under the gateway. The Template Manager
view loads and displays all the templates available on Niagara.
- The Template Manager view supports the following features:
- Pagination
- Select the number of records to show on each page (10, 25, 50, 100)
- Click Add to add a new template
- Click the edit icon under Options for a row to edit a template created through Niagara
- Click the delete icon under Options for a row to delete a template created through Niagara
- Click Sync to sync templates from the gateway to Niagara. For each template on the gateway, a corresponding component is created under the sensor templates component and automatically loads in the view.
- Click Sync whenever there is a change to a template or if you create any new templates on the gateway.
Add a template
- Click Add on the Sensor Definition Manager view to launch the Template view.
- Wait for the Template view to load.
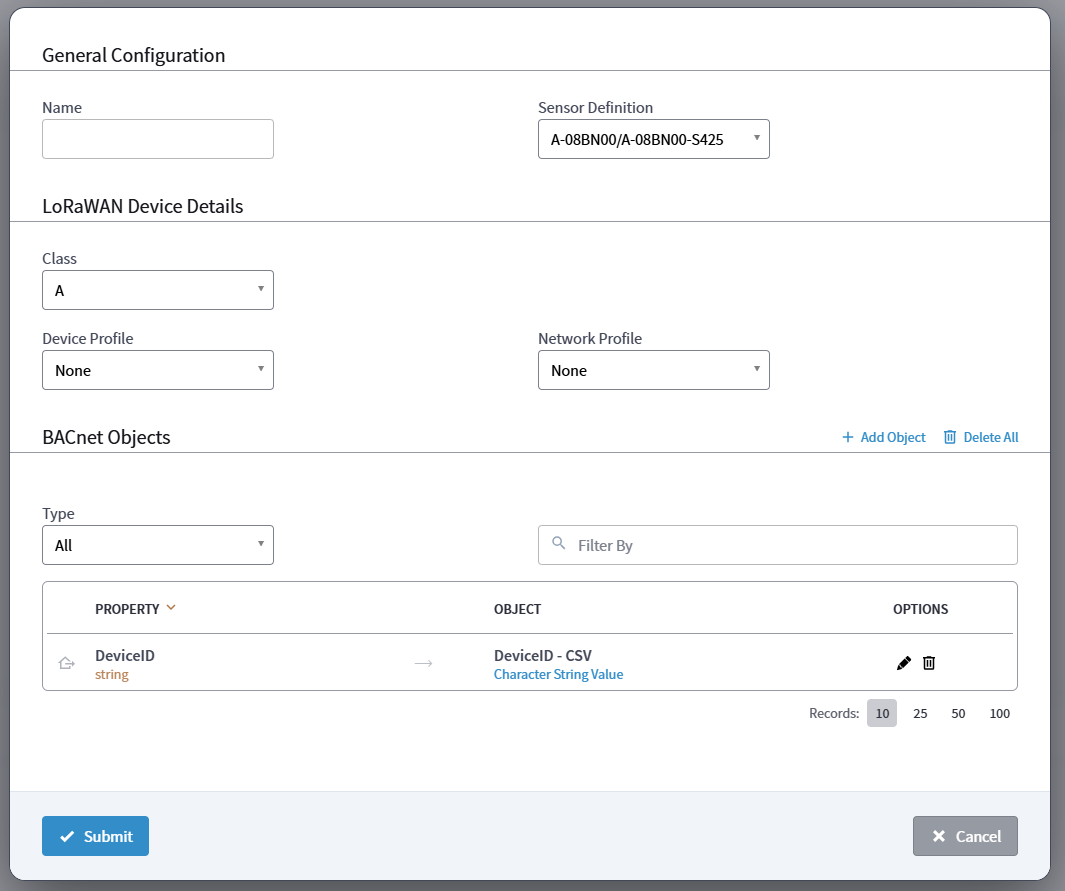
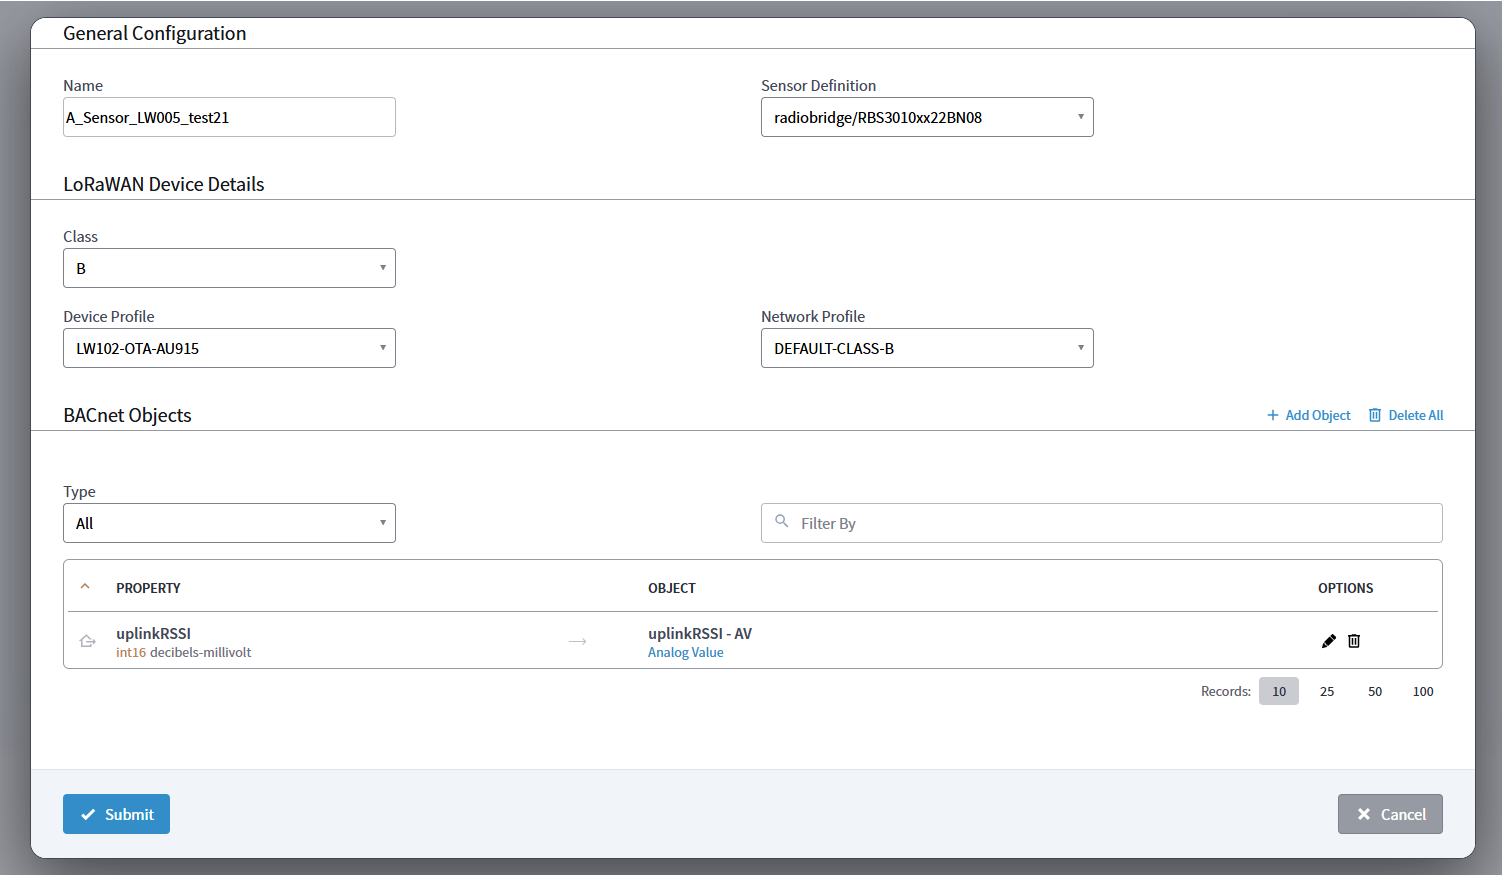
- Review the Template view, which has three sections:
- General Configuration - This section has a Name field and a Sensor
Definition field.
- Name – A text field with a max length of 256 characters.
- Sensor Definition – A drop-down list of sensor definitions in Niagara.
- LoRaWAN Device Details - This section has three drop-down list fields
for Class, Device Profile, and Network Profile.
- Class – A drop-down list of three pre-defined options of A, B, and C.
- Device Profile – A drop-down list of the pre-defined device options:"", “LW102-OTA-US915", "LW102-OTA-AU915", "LW102-OTA-EU868", "LW102-OTA-AS923", "LW102-OTA-KR920", "LW102-OTA-IN865”.
- Network Profile – A drop-down list of the pre-defined options: "", "DEFAULT-CLASS-A", "DEFAULT-CLASS-B", "DEFAULT-CLASS-C”.
- BACnet Objects - This section contains a table of BACnet objects defined from sensor definitions. The table contains filters for BACnet object types and text filters and allows users to add BACnet objects pre-populated from the selected sensor definition. The table contains 3 columns: Property, Object, and Options. The sensor definition JSON contains the desired BACnet properties to show.
- General Configuration - This section has a Name field and a Sensor
Definition field.
- Enter the desired template name in the Name field, which validates for the following:
- Empty, null, or not allowed
- Maximum of 256 characters allowed
- Select from the drop-down lists for all remaining fields.
- Click Add Object to add BACnet properties to the view. A window displays to select a
property and type and enter a name for the BACnet object.
- Select an available property from the Property drop-down list, then select an
associated type for the selected property from the Type drop-down list. Enter
a name for the BACnet object in the Name field and click OK to add the
BACnet object to the list.
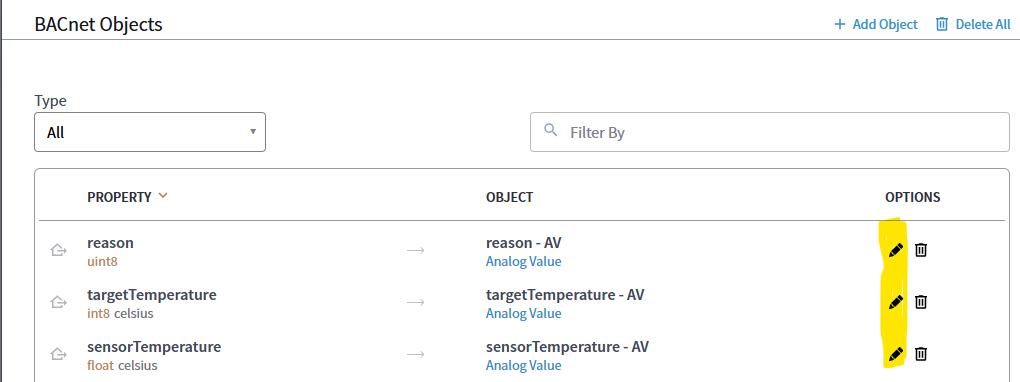
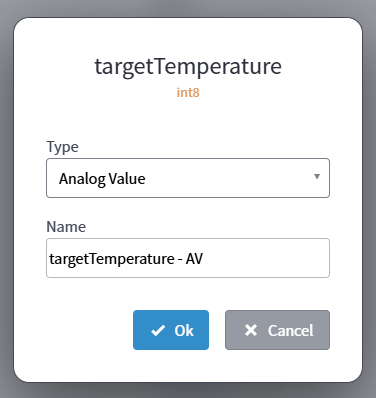
- Click the edit icon under Options for a row to edit a BACnet object. A window displays
to edit the property type and name.
- Select a new associated type for the property from the Type drop-down list and edit the
property name, if needed. Click OK to save your edits.
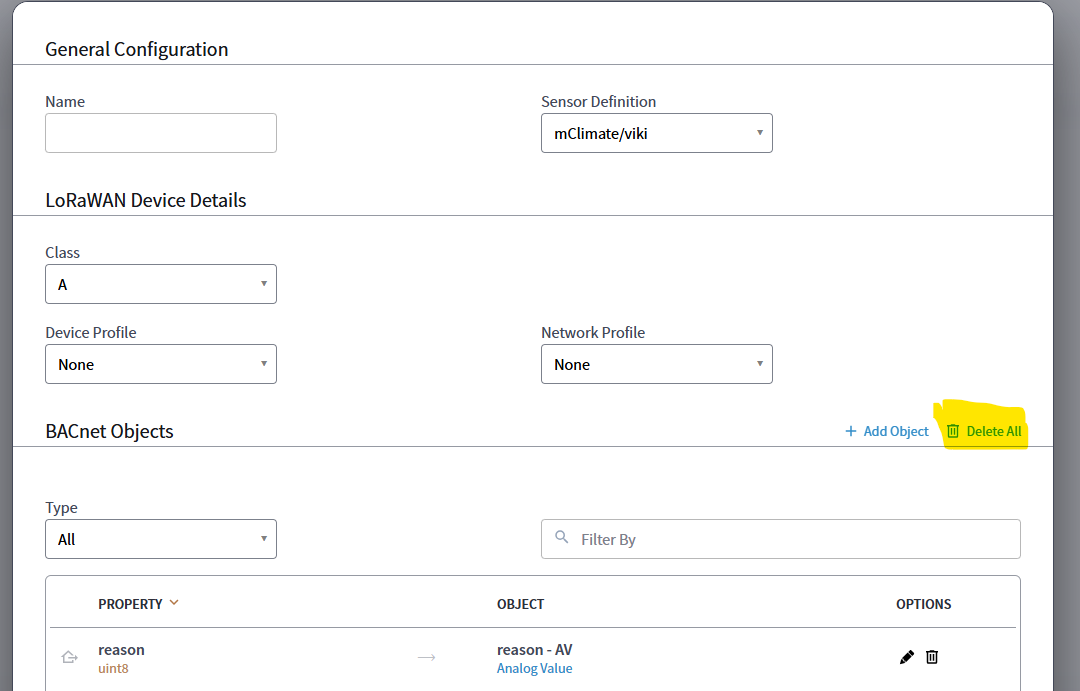
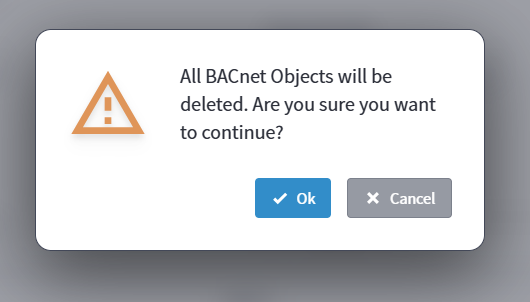
- Click the delete icon under Options for a row to delete a single BACnet property. Click
Delete All to delete all BACnet objects in the list. A confirmation
message appears.
- Click OK to confirm removal of all BACnet objects or click Cancel to return to
the Template view.
- Click Submit to create the template or click Cancel to return to the Sensor Definition Manager view.
- Review the template notification that appears after you submit the new template. You will
either see a success or a failure message.
- Add success:
- Add failure:
- Add success:


Edit a template
- Double-click the Sensor Templates component under the gateway. The Template Manager view loads and displays all the templates available on Niagara.
- Click the edit icon under Options for a row to edit a template created through Niagara.
- Modify one or more of the following fields to edit a template for sensor definitions
available in Niagara:
- Name
- Sensor Definition
- Class
- Device Profile
- Network Profile
- Add, edit, or delete BACnet objects
- Delete all BACnet objects
- Review template details for sensor definitions not available in Niagara. The following
actions are disabled for these sensor definitions:
- Add, edit, or delete BACnet objects
- Delete all BACnet objects
Delete a template
- Double-click the Sensor Templates component under the gateway. The Template Manager view loads and displays all the templates available on Niagara.
- Click the delete icon under Options for a row to delete a template created
through Niagara. The delete action is disabled for sensor definitions and their
templates not available in Niagara.
- Click OK to confirm template deletion or click Cancel to return to the
Template Manager view.
- Review the delete notification that appears after you delete a template. You will either
see a success or a failure message.
- Delete successful:
- Delete failure:
- Delete successful:


Sensor Manager view
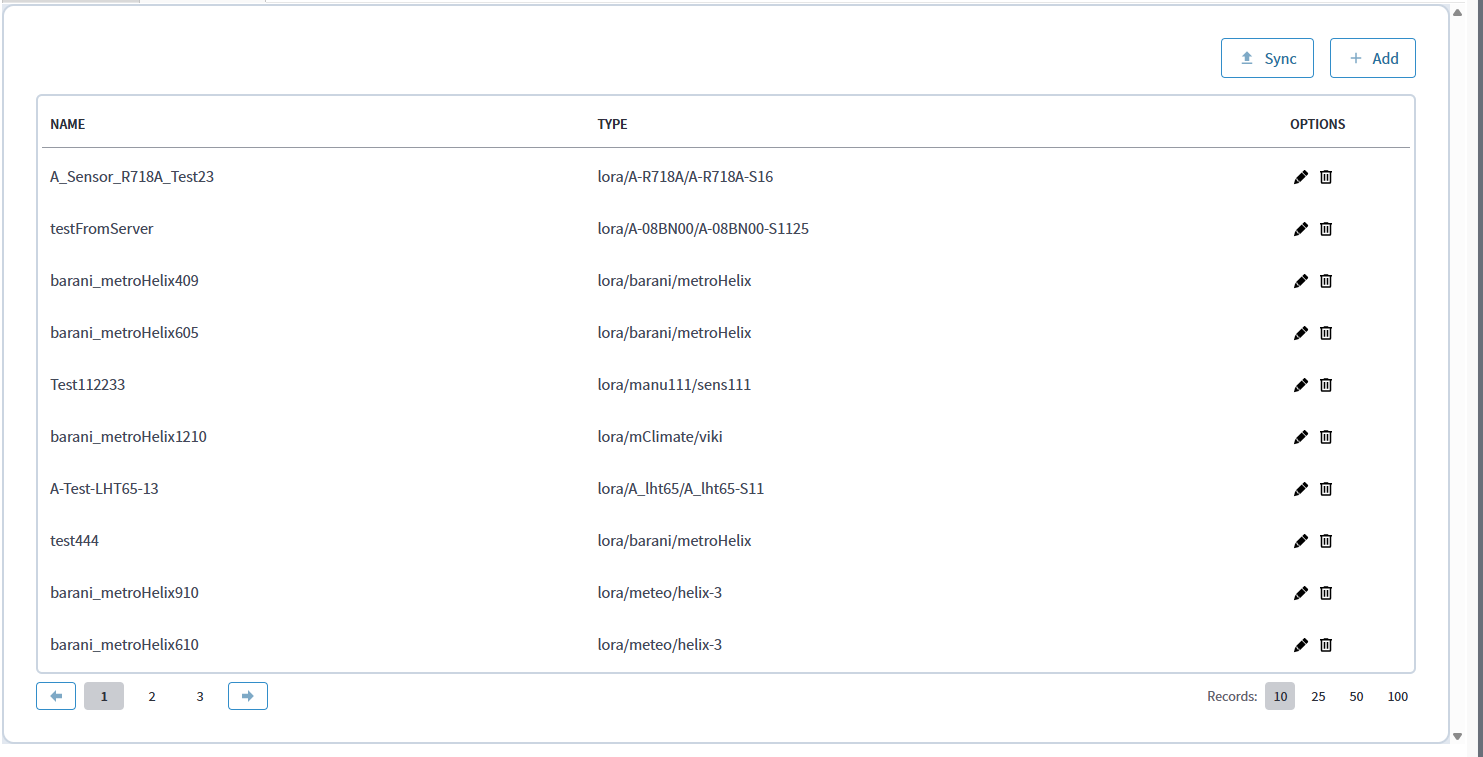
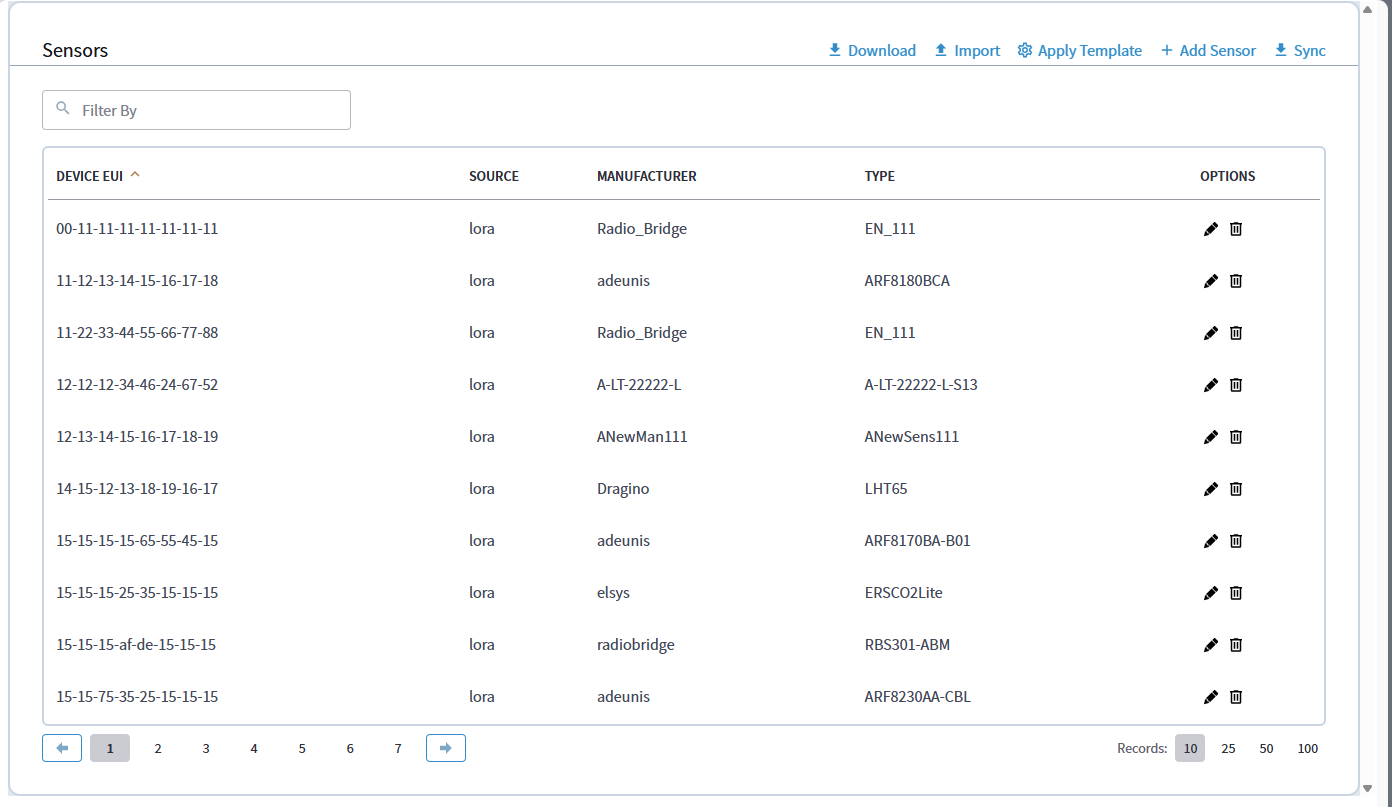
- Double-click the Sensors component under the gateway. The Sensor Manager view loads and
displays all the sensors available on Niagara.
- The Sensor Manager view supports following features:
- Filter rows by entering text in the Filter By field
- Pagination
- Select the number of records to show on each page (10, 25, 50, 100)
- Click Download to export all sensor information to a JSON file
- Click Import to add sensors from a JSON file
- Click Apply Template to create sensors with a template or apply a template to existing sensors
- Click Add Sensor to create sensors without a template
- Click the edit icon under Options for a row to edit a sensor
- Click the delete icon under Options for a row to delete a sensor
- Click Sync to sync sensors from the gateway to Niagara. For each sensor on the gateway, a corresponding component is created under the sensors component and automatically loads in the view.
- Click Sync whenever there is a change to a sensor or if you create any new sensors on the gateway.
Download a sensor
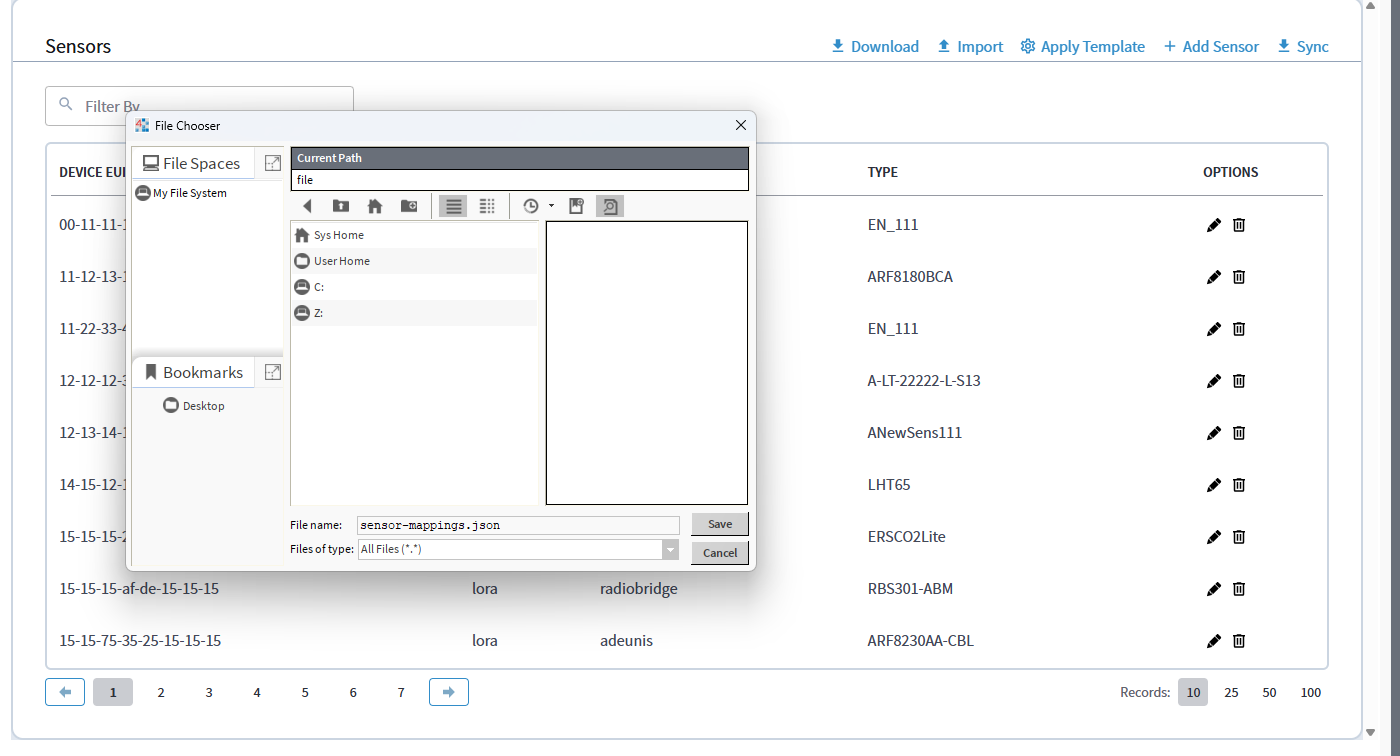
- Click Download on the Sensor Manager view to export sensor details to a JSON file and
download it locally.
- Select where you want to save the JSON file in Niagara’s File Chooser window. The
file name defaults to sensor-mappings.json, but you can edit this as needed.
Click Save to save the file.
- Review the JSON format of the downloaded file, if needed.

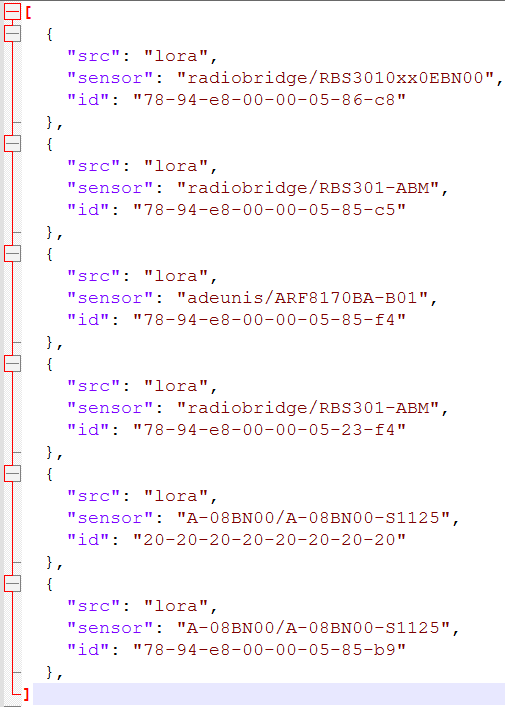
Import a sensor
You must add the sensor JSON files to import if they do not display in the Files folder on the station.
Verify the sensor JSON file format consists of a JSONArray. Each sensor you add to a gateway must have a JSONObject in that array with a device eui, src, and manufacturer/type included.
[
  {
    "id": "00-11-12-11-11-11-11-11",
    "sensor": "mClimate/viki",
    "src": "lora"
  },
  {
    "id": "00-11-12-08-13-14-15-16",
    "sensor": "mClimate/viki",
    "src": "lora"
  }
]
JACE installation
- Open the Platform of the JACE.
- Click File Transfer Client.
- Transfer files from your computer to the Files folder on the JACE.
Windows/Linux Station installation
- Go to the Files folder on the station.
- Right-click in the blank area and choose Copy From. This opens a window for you to
copy sensor files from your computer to the Station > Files folder.
Import a sensor
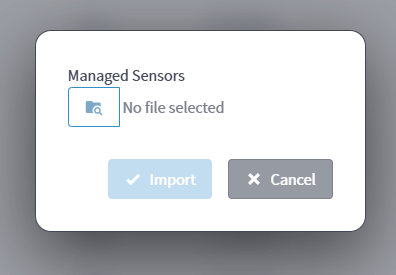
- Click Import on the Sensor Manager view to open the Import Sensor window.
- Click the folder icon to open a browser window to select the sensor JSON files. Remember
to add these files to the station Files folder before the import, as the
scope of the file picker is only to this folder.
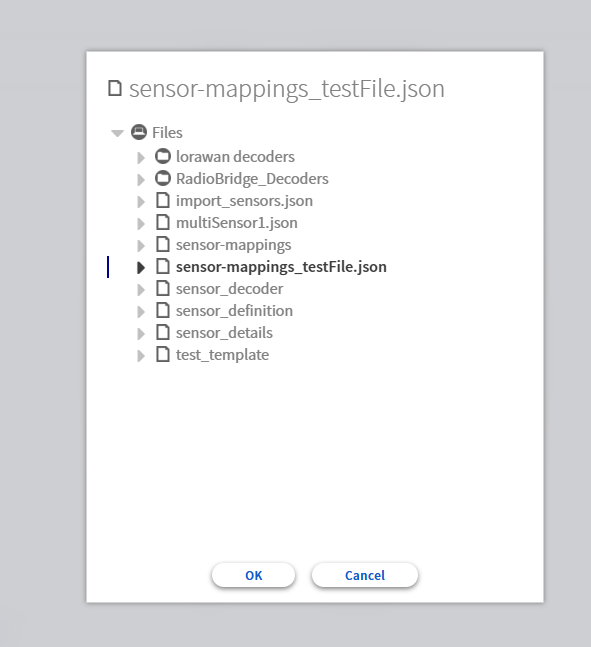
- Select the JSON files in the File Chooser window. It is your responsibility to
select the correct files to add the sensor definition without errors. Click
OK to return to the Import Sensor window.
- Click Import to start uploading the sensors to the gateway and Niagara. The new sensors load in the Sensor Manager view.
- Review the import notification that appears when the sensor definition uploads. You will
either see a success or a failure message.


Apply a template
- Click Apply Template to create new sensors by applying a specific template. The
Apply Template window appears.
- Select a template type from the Sensor Type Template drop-down list to apply it to
the sensors created in this view. The list includes all templates available in
Niagara.
- Enter an integer value in the BACnet Object Identifier Start Value field. The value must be between 0 and 4194302.
- You can create sensors in two ways:
- Click Add and enter the following details:
- Device EUI: Must be an 8-byte hexadecimal value (pairs).
- APP EUI: Must be an 8-byte hexadecimal value (pairs).
- APP KEY: Must be a 16-byte hexadecimal value (pairs).
- Click Add in the window and verify the new sensor appears in the
Apply Template view. Repeat for each sensor you want to add.
- Click the edit icon for a row under Options to edit a sensor or click the delete icon for a row under Options to delete a sensor.
- Click Import to import a JSON file containing sensor details (Device
EUI, APP EUI, and APP KEY) instead of manually adding it in the Apply
Template view.
- You must add the sensor JSON files to import if they do not display in the
Files folder on the station.
- JACE installation:
- Open the Platform of the JACE.
- Open the File Transfer Client.
- Transfer files from your computer to the Files folder
on the JACE.
- Windows/Linux Station installation:
- Go to the Files folder on the station.
- Right-click in the blank area and choose Copy From.
This opens a window for you to copy sensor files from your
computer to the Station > Files folder.
- Go to the Files folder on the station.
- JACE installation:
- Click Add and enter the following details:
- Click Import and select the sensor JSON files, then click OK.
- Verify the selected sensors appear in the Apply Template list and are ready to submit.
- Click Submit to create the sensors with the applied template. For each sensor on the gateway, a corresponding component is created under the sensors component and automatically loads in the view.
- Review the apply template notification that appears when the submission completes. You
will either see a success or a failure message.
- Apply template success
- Apply template failure
- Apply template success


Add a sensor
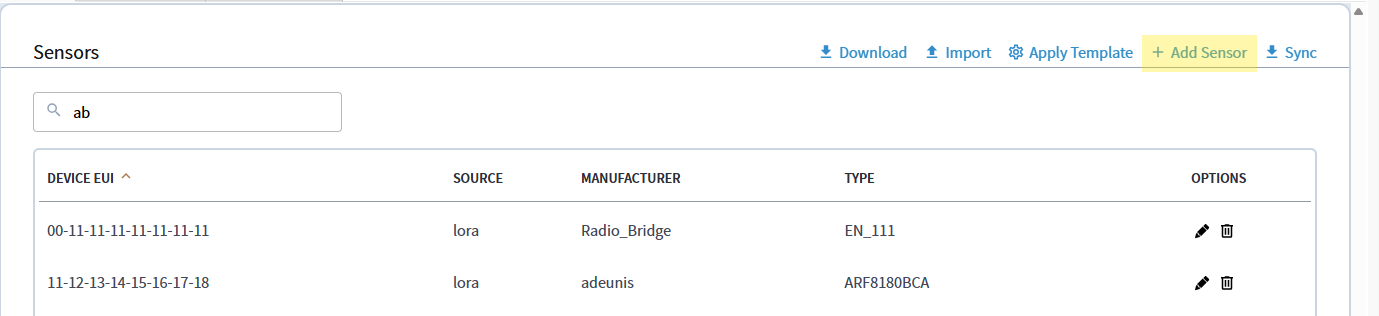
- Click Add Sensor to create a new sensor in the Sensor Manager view. The Add Sensor
window appears.
- Verify the correct source appears in the Source drop-down list or select a new one,
then enter a unique 8-byte hexadecimal value (pairs) separated by hyphens in the
Device EUI field.
- Verify the correct manufacturer appears in the Manufacturer drop-down list or select a new one. This value populates from the sensor definitions available in Niagara.
- Verify the correct type appears in the Type drop-down list or select a new one.
- Click Add in the window to create the new sensor and verify it appears in the Sensor Manager view.
- Verify a corresponding component appears under the sensors component and automatically loads in the view.
- Review the add sensor notification that appears when the creation completes. You will either
see a success or a failure message.
- Add sensor success
- Add sensor failure
- Add sensor success


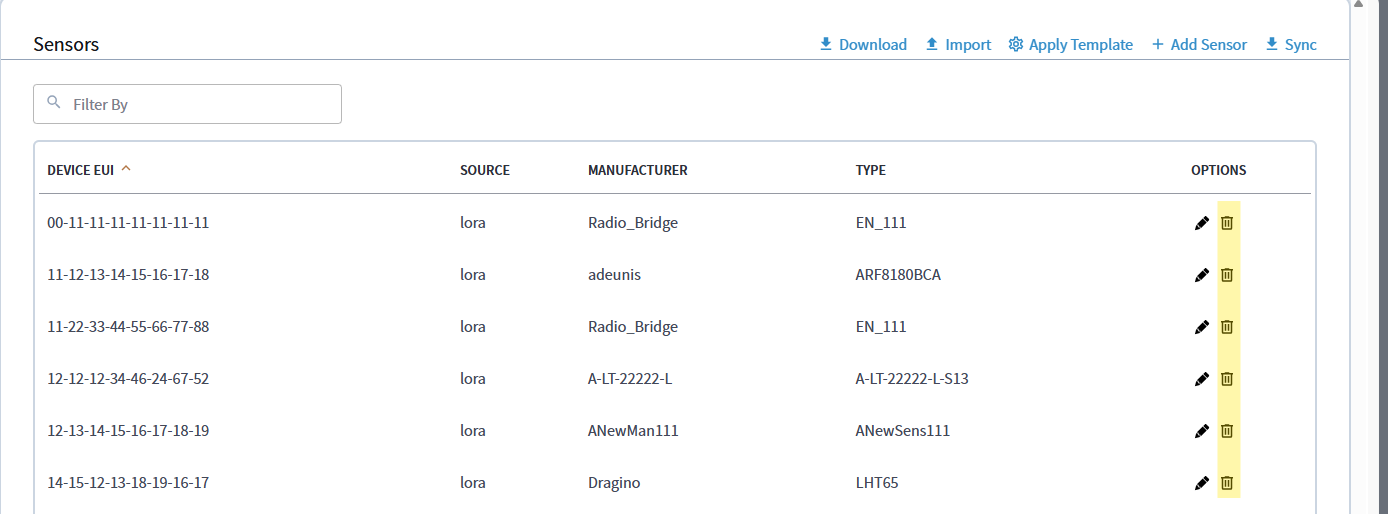
Delete a sensor
- Click the delete icon for a row under Options to delete a sensor.
- Click OK to confirm template deletion or click Cancel to return to the Sensor
Manager view.
- Review the delete notification that appears after you delete a sensor. You will either see a
success or a failure message.
- Delete successful
- Delete failure
- Delete successful


Edit a sensor
- Click the edit icon for a sensor row under Options to add, edit, or delete sensor
BACnet properties.
- The Edit Sensor view contains the following fields and controls:
- Device EUI: A drop-down list for selecting a sensor by device EUI, which automatically updates the Type and BACnet properties for the sensor
- Source: A read-only field indicating the sensor source
- Type: A read-only field indicating the sensor manufacturer and type
- Add Object: Click to add a new BACnet object
- Delete All: Click to delete all BACnet properties
- BACnet Objects table: A table listing all BACnet properties for the sensor, including pagination, text filtering, and filtering by type
- Edit or Delete: Click the edit or delete icon for a row under Options to edit or delete properties
- Click Add Object to add a new BACnet property to a sensor.
- The Add Object window contains the following fields:
- Property: A drop-down list of available properties for the sensor type
- Type: A drop-down list of BACnet properties based on the Property field, which updates whenever the property selection changes
- Identifier: Enter the OID for the BACnet property, which is a unique combination of identifier and type made up of integers between 0 and 4194302
- Name: Enter the name of the property, not to exceed 128 characters or be left blank
- Description: Enter the description of the property, not to exceed 128 characters or be left blank
- Click OK to create the BACnet property on Niagara and the gateway and add it to the
corresponding sensor. Review the object addition notification that appears when the
submission completes and the property automatically loads in the table. You will
either see a success or a failure message.
- Add object success
- Add object failure
- Add object success
- Click Delete All to delete all BACnet properties for a sensor.
- Click OK to confirm you want to delete all BACnet objects for the
sensor on Niagara and the gateway.
- Verify the Sensor Manager view updates to reflect the deletions. Review the
delete notification that appears after you delete all. You will either see a
success or a failure message.
- Click OK to confirm you want to delete all BACnet objects for the
sensor on Niagara and the gateway.
- Click the edit icon for a row under Options to edit a BACnet property.
- The Edit Object view contains the following fields and controls:
- Property: A read-only field showing the property for the selected BACnet object
- Type: A drop-down list of BACnet property types based on the Property field, which defaults to the current property's type
- Identifier: Edit the OID for the BACnet property, which is a unique combination of identifier and type made up of integers between 0 and 4194302
- Name: Edit the name of the property, not to exceed 128 characters or be left blank
- Description: Edit the description of the property, not to exceed 128 characters or be left blank
- Click OK to confirm your property updates or click Cancel to return to the Sensor Manager view.
- Review the update notification that appears when the refresh completes and
the property updates automatically load in the table. You will either see a
success or a failure message.
- Update success
- Update failure
- Update success
- The Edit Object view contains the following fields and controls:
- Click the delete icon for a row under Options to delete a BACnet property.
- Click OK to confirm the property deletion on Niagara and the gateway
or click Cancel to return to the Sensor Manager view.
- Review the delete notification that appears after you delete a property. You
will either see a success or a failure message.
- Click OK to confirm the property deletion on Niagara and the gateway
or click Cancel to return to the Sensor Manager view.


